Tuesday 31 July 2012

Wrinkles....


Hello

Today's 
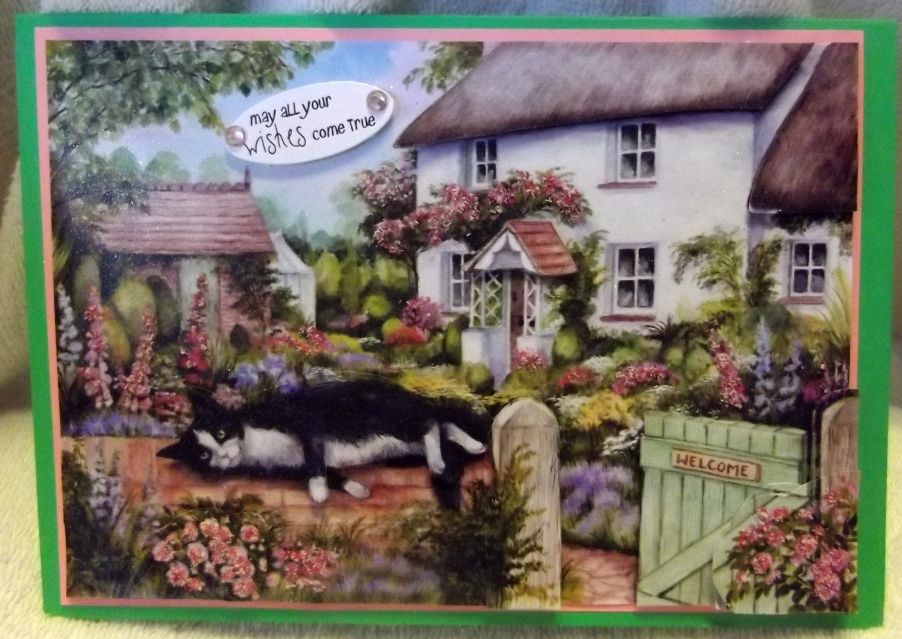
card is made using a sheet that was purchased from www.craftsuprint.com and designed by Janet Briggs

The sheet number for anyone interested is 342049_68

To make my card I started by cutting out all the decoupage – have to say it was really easy to cut out too

I made up the layers of decoupage using tiny sticky pads and lightly curled the top most layers

The completed image measured approx 6x6 but if I made a square card using A4 card folded it wasn't big enough and if I used a bought square card it was scallop edged so the image covered the inner most sections of the scallop

So I decided this would have to be an 8x8 card

I started by using the lovely new Tim Holtz distress ink pad Shaded Lilac to colour all the edges of the card

Then I found a sheet of pink spotty paper so cut it to size then punched the side edges with a Tonic border punch

Stuck this onto the card using double sided tape

The card still looked lost so I cut 2 11cm squares of card – one in lilac and the other was silver heart holographic mirri card and punched the corners of both with a Martha Stewart bubble bath corner punch

I added double sided tape to the back of the squares and positioned them to the top left and bottom right corners on the backing paper

The image was then sat on top of those!

I made up a silk flower using 3 different coloured petals and pushed a pink gem set flower shaped brad through the centre, folded the brad legs at the back and stuck a large sticky pad over it to fix to the bottom left corner of the card

I used 2 of the many sentiments as couldn't decide which one I liked best

The photo's were taken before I embellished the card but I added pastel pink gems around the circular centre and then pale blue gems for the bubbles as well as a blue in each corner.

Looks great – and its ideal for teens through to pensioners!

Would love to know what you think of it please...

X

Monday 30 July 2012

For ewe....


Hello again folks

Another of the kits I have had this month and again just don't know who it was designed by

But what I do know is it is the lovely Nitwits collection of images!

I roughly cut the main card image – I believe this is called an envelope card by the design of it – so once it was cut I sprayed the back with Crafters Companion Stick & Stay and secured it to a sheet of white card

I then cut it all out properly together with all the decoupage elements and 2 pieces that make the envelope

I used the lovely new Tim Holtz Shaded Lilac distress ink pad from his new Spring Editions to lightly cover the inside of the card

I did this as the 2 part insert doesn't actually cover the whole of the inside – instead it leaves a lovely border all round

After sticking in the inserts I found the Especially For Ewe panel over hangs the edge of the card at the top so matted it onto lilac card, cut it out then attached to the inside of the card

The decoupage was easy to cut out – my only complaint with it was it took over an A4 sheet to add the decoupage when in reality it would have all fitted comfortably onto an A5 sized sheet!

The envelope matches perfectly making a great finishing touch

The card simply says Especially For Ewe so is suitable as a card for any occasion – even just a hello card

Hope you like this cutie card – I have a real soft spot for lambs!!

See you again tomorrow I hope...

x

Sunday 29 July 2012

Gone Walkies


Hi

I actually printed this kit out at the start of July and even made a start on cutting it out – then for some strange reason it got put into a folder and forgotten about

Today I have had my 2 girls and lovely grandson down for the day so it didn't leave me much time to get a card made up to share

So I grabbed the folder which is all part cut sheets or kits and spotted this kit

I really have no idea as to what its called or who it is designed by – I was going to try locate it but have around 300 kits that have been bought since the start of July so I decided against it – I could have printed – cut out – made up another card in the time it could take me to find this kit for the info – all I know is it was purchased from www.cardmakingdownloads.com

Right then to the card....

I started by cutting out all the pieces and then sprayed the back of the main card with Crafters Companion Stick & Stay and fixed it to the lovely bright orange card then re-cut it out.

The main card then had to be stuck to the frilled back card which I also stuck to the same bright orange card

So now we have the basic card – its a normal card but has a shaped back and on the reverse of the back was another kennel panel which was placed sort of centrally and it left some of the orange showing all round it!

The inserts were in 2 separate pieces – I know when I came to print the kit it had a couple of different inserts but I decided to write a few simple lines....I guess that was because I have made this card cos I like it not because I need it – I'm pretty sure I have a friend who will ask if its for sale – won't you Ann?

So I stuck the 2 inserts in place which again left a slight border of orange all around the image

Using small sticky pads I added the 3d decoupage to the card front

Lastly it was the matching envelope – perfect fit – went together perfectly too!

The card is bright and cheerful – and I think would make a great card to send to a friend or pen friend just to say Hello

Would love to know what you think to it too...

Until the next card then...

x

Saturday 28 July 2012

Summer Days


Hi

This is the card I made up for yesterday and didn't get photographed

I used a lovely new cd called Cottage Delights 2 Summer Days – this is a Squeezee cd but I think the designers have finally taken on board that we card makers love the designs but not the squeezee card design as they have now includes squeezee cards in 3 different sizes as well as a whole folder using the images as normal 3d decoupage

So this is what I used!

I just loved the chocolate box picture – and the big cat lazing on the stone wall....

I used a bright green A5 card blank and added a piece of pink card to the front which my base layer of decoupage was matted onto

The decoupage is really easy to cut out on these sheets so it makes up a quick card and its all on one sheet for printing!

Once it was all made I sprayed the card with Crafters Companion glitter spray

Once this was dry I added raspberry flower soft to all the pink flowers on the card

Its such a lovely card

There wasn't any sentiments with this sheet so I used one I had in my odds n sods box of sentiments

Only other thing I did was attach a couple of pretty pink AB gems either side of my sentiment

See you tomorrow

x

Opening Ceremony!!!


Hello

I did make a card to share but as yet it isnt photographed

And of course its now into a new day

The main reason is I just sat through the whole 6 hours of the Olympics opening ceremony!

What a wonderful display

The number of times I shed a tear

Had a smile that stretched ear to ear

Saw things that made me think

All in all it was a fabulous ceremony that will be talked about for years to come!

I loved how it all started and as the theme changed how the people involved smoothly carried off the set as part of the show – then new sections were brought on and fitted – so smoothly

There was an amazing tribute really to GOSH – Great Ormand Street Hospital – with both patients and staff taking part

The Queen and James Bond made a spectacular show

Mr Bean starred in the orchestra – highly amusing as we all expect from this funny man

Mohamed Ali was there to greet the Olympic flag – a very sad sight to see such a great man in the poor state of health he is in now

Have to say the torch bearers in the stadium who were all nominated by the best sports men and women of GB did us proud with their roles

It had speeches, musical performances by the best there is and a firework display that was truly breath taking!

Well done to everyone involved in this the 2012 Olympics here in London, England

Let the games begin!!!

See you tomorrow with my card

x

Thursday 26 July 2012

Shabby Chic Christmas


Hi

I have at last a card to share with you

Its a quick and easy card but you can add whatever you fancy to it despite it coming through as a card on a sheet

This is from the new Debbi Moore Shabby Chic Christmas Collection

Its a 4 cd set but so lovely I'm glad I managed to get my hands on it!

I went print happy when browsing it this morning – wouldn't mind but I've had the cd for a week or two but only just looked through it!

In the end – and only because I was running short of time – I made up one of the Quick Cards – this was the A5 size – she does them in A5, A6 and Square

So after printing the sheet I first noticed that the 3 sentiments on the sheet were things I would never use – it was With All My Love, Peace On Earth and the last Just For You – as I said, I wouldn't use any of them – especially knowing this is just a general christmas card

So what I did was cut one of the sentiment panels out and then a piece of black card that fitted inside the actually frame – after rummaging through my left over sentiments from other cards I came across something suitable – so simply stuck it in place with double sided tape!

For my card I cut out the backing panel which has a printed border – cut out the image panel and mounted this onto foam tape and stuck inside the backing panel leaving enough space at the bottom to attach my sentiment.

As I wanted to use a red card bland I decided to mat the main panel onto gold mirri then onto my card blank...

A length of green printed ribbon was simply stuck down the fold edge.

For decoration I used Stickles in gold, silver, red and holly green – dots of these were randomly placed over the christmas tree and the holly green created larger dots of colour in the 4 outer corners.

The silver was used on the sentiment panel

And that's another traditional christmas card added to the pile!

See you the next time...

x

Wednesday 25 July 2012

Beautiful Backing Papers

Evening all
Today I am not sharing a card but some free backing papers I have made
I have done 3 sets


So you will get a landscape and a portrait per set


The images I used were photographs taken by my lovely friend Ann


She had these on her blog today and I couldn't resist using them as they were perfect for papers.
I have shared the link to Ann's blog before but just in case you haven't had a look here it is again
What I will just stress here is that I have had full permission from Ann to use her photographs and they are all copyright to Ann©
I have added Ann's original photo then the 2 papers.
The papers here are also copyright ©Ann & ©Angie
Please click on the papers to make full size then save as to your computer
I hope you will find a use for your free backing papers
And once again – thank you Ann
See you all again tomorrow
x

Tuesday 24 July 2012

Jumbo Designs


Hi there

Well today has been a scorcher – at 4.30pm my outdoor thermometer was actually reading 34.7 degrees – and even now – at just after 9pm its still reading 25.8 degrees...so pretty hot and uncomfortable!

I had hoped to get a card or two finished at class this evening but its been a nightmare – decided to share some new techniques – then I was asked about masks so came home to get them – saw happenings in the empty house next door – got caught in conversation with a neighbour and it goes on and on

Ended up with the police calling me regards the empty property...you get the picture...

So I didn't get to work on my cards – got one cut out but not actually made the card up yet...

So I thought you might like to see something I did at the weekend

I joined a yahoo group that is just for UK ATC makers – yeah!!! I love doing atcs but there are less and less swappers around now

I signed up for all the swaps and one was called JUMBO swap – a normal atc is 9cm x 6.5cm but the jumbo was 8.5cm x 12cm

I was looking forward to the challenge but had no idea as to what to do

So I started by cutting up some thick board – it was the natural grey colour so covered it with white card.

Using the pan pastels I coloured the backgrounds using lemon – orange – sepia then white was rubbed over the whole card to tone the colour down a bit.

I then used my lovely lady stamps by Clarity Stamps on two of them and a lady's face and eye from Inkilicious on the other

The stamp was also partially stamped onto a chipboard tile – I coloured with pan pastels then covered with versamark pad and clear embossing powder and heated up

The mini tile was then covered with Cosmic Shimmer PVA glue and attached to the stamped image – matching the lines!

To highlight the design I used a white gel pen then used a sentiment stamp on each design

A brad was finally added to each to finish

Personally I think they look lovely – but I suppose I could be biased lol

See you tomorrow folks

x

Monday 23 July 2012

21 Today


Evening everyone

Well its been a super hot day here again so naturally I made use of the sun – again!

At teatime we decided to give the dogs their dose of Frontline as I had heard there was a problem at the moment with fleas and that's one thing I don't want my dogs having...

For people who haven't used this stuff its just a small pipette of solution that has to be poured onto the skin between the dogs shoulder blades.

Pete & I do this together as Lurchers are big dogs and have so much hair its a hard job parting the hair enough to add the stuff as well as keeping the dogs still

It only takes us about 5 minutes to get all 3 dogs done so came in to thoroughly wash my hands and shock – horror – my nails!!!

I had acrylics put on around 3 months ago and I love them – but that stuff has dissolved the top coat of nail polish – not too bad then – until one nail just dropped off for no reason – then when I was searching for something I was so annoyed to find 2 other nails have chipped and broke – good job I have managed to get an appointment tomorrow to put them all right again – phew!!!

On to the card for today – you may recall I was asked to make 3 special cards for a 1 year old, 2 year old and 21 year old – I shared the 1st birthday card – it was the 4 cute pink elephants and hearts – well the card I have done here is for the 21st birthday

You might recall seeing this in the past – its the 3rd time I have made now and I just love the design

Its a Giant Easel Tableau kit rom www.craftsuprint.com and as with all these GET kits they are designed by Valerie Dawes – it is called quite simply – 21 Today

So I printed all the sheets and then roughly cut out the pieces I decided I wanted to stick to card stock for support – they were then sprayed with Crafters Companion Stick & Stay then secured to white card and cut out.

These kits all require a lot of cutting out so I did that over a few days as they can get boring when you have to cut out the same thing over and over again – for this card it was the small blue flowers.

When I came to make up the card I didn't have to stop and think about where pieces went – but one thing I have learned from doing all the GET cards – they are back heavy – so once its all made up the biggest piece at the back either won t stay stood up or it tips the whole card over.

To get around this I now add approx 1cm of Velcro – its a huge success and its only visible when you have to drop the card down to put in the envelope

As yet I haven't embellished the card or made up the envelope for this or the elephant card – as the cards aren't needed for another few weeks I thought it better to complete all 3 cards then decorate and make envelopes prior to them being collected.

That's your lot for today folks but see you tomorrow I hope

x