Monday 30 April 2012

Freebies!!!


Hello everyone...

Today I have some freebies for you...

Mind you they may not be to your cup of tea – literally!!!

I was asked if I could make a card for a guy who suffers from Aspergers Syndrome and he just loves his cup of tea!

Well I asked lots of crafty friends for help with this – and as usual they came up trumps...but I still didn't spot anything that jumped out at me!

Maybe it was because it was for a man – I have lots of lovely sheets and kits to suit a tea lover but they are all so feminine

Then I found a set of lovely rubber stamps that were tea related – which meant I could colour to suit myself...

Sat watching tv and an ad came on for a famous brand of teabags and that was it....

So after gathering some images, I fired up my PSP and this is what I came up with....

ANN – don't worry – I have created something different for your card which obviously I wont share on here!!

Hope you all like the freebies – you may never have a need to use them – but then again they look pretty cute so would make a great card inviting a friend round for a cuppa!!


See you tomorrow....

x

Sunday 29 April 2012

Flower Soft - What to do with it!


Hello everyone!

I am sharing a couple of ideas on what to do with your flower soft!
This came about when a friend asked just what I did with it!

I think its something that we don't really use as often as we should – maybe that is because when we see it used on Craft programs its always to make up the pretty bouquets for the front of cards...

Well as nice as they may be – I just cant be bothered to make them – far too fiddly!

But I do use flower soft in other ways with my card making and scrap booking...

Just remember to actually put your flower soft into a large container – many people use the chinese trays which have lids as they are cheap to buy, stack on top of each other and you can clearly see in them!!!


Here are a few very simple ideas!

A border... simply use double sided tape – a width to suit the project – place along the edge, remove the backing tape, sprinkle with flower soft, press it down firmly into the tape, then tap the card into your tidy tray so you save all the bits – I then use a fluffy make up brush to brush over that border which removes the excess flower soft!


To Stamp.... I used my flitter glu by IndigoBlu to ink up my stamp and then stamped to my card – I sprinkled plenty of flower soft all over the design, then pressed it to the design lightly so as to cover all the glued area – when I was happy it was all covered I tapped off the excess. This was just a basic idea – you could actually stamp the design as I have then fill in the areas with different coloured flower soft for something totally different!

To highlight.... I stamped out 3 identical flowers and on the 1st I used PVA glue to cover the whole of the flower centre and covered with flower soft, pressed it down and removed excess, the centre flower doesn't show too well on the pic but I used the pva on the dots in the centre of the flower and covered with flower soft! The 3rd flower I just highlighted parts of the leaves and covered with the flower soft – all 3 flowers look totally different don't they?


For text – I stamped Happy Birthday twice – the top one I used a Sakura quickie glue pen to highlight the text and then covered with flower soft – after a few moments I brushed away the excess. The bottom one I just highlighted the H & B and coloured in the solid parts of letters with the quickie glue pen then covered with the flower soft!


And my final example for today is to use to create grass – I stamped these flowers in a row, added a single dot of PVA to the centres then a heavy swirl of PVA to represent the grass – covered with thick clumps of flower soft, pressed well into the glue then gently brushed away the excess....


So you see, flower soft is great for your card making projects – and why not go a step further – add a small scoop of glitter to your flower soft so you have a lovely glittery look every time you use it!

Create your own unique colours – just as I have in the examples shown – I keep a bag with the flowersoft so all the excess that falls off to my workspace gets scoped into the bag – I use it for trying new ideas as well as adding it to my projects!!

Would love to see just what you do with yours!!!

See you next time....x

Saturday 28 April 2012

A Vintage Feel


Bet you're pleased to see me back at a reasonable time today – I prefer to get my card shared around this time

I have had a day of play – just as I wanted...but not sure I made good use of my time...

I have made a few cards using the free sheet of stamps that came in issue 4 of Creative Stamping magazine

Maybe I should re phrase that – I have part made a few cards as they all need that finishing touch...


Like this card – I want a piece of Hessian or something similar – but it looks ok to share anyway!

So I used a sheet of Kraft card – I bought a pack of 12x12 Kraft card when it was mega popular not so long ago – and as I generally seem to do, I put it away without looking at it...so today I thought I would make up of it – and found it was plain on one side and the other was ruled, filed and squared! But never mind, it makes an interesting inside and the insert covers most of it anyway.

So I cut the card to make my card blank measuring approx 7” x 5” .

Another set of 12x12 card I bought and put away came out too – it was the Black Magic core-dinations card – the sheet I used was black with a blue core...


I cut a piece to fit the cuttlebug and used a Creative Expressions Watches mask to emboss with....once it was embossed I used a Tim Holtz sanding block to rub off the surface of the black exposing the antique blue core of the card.

This was then cut down to fit on the card front leaving a narrow border all around the card.

I used a scrap of the kraft card and punched a border using the Martha Stewart Optic Dot border punch....this panel was stuck to the right hand side of the card....


I used a scrap of the core-dinations card and sanded the edges – this was then stuck on the punched panel.

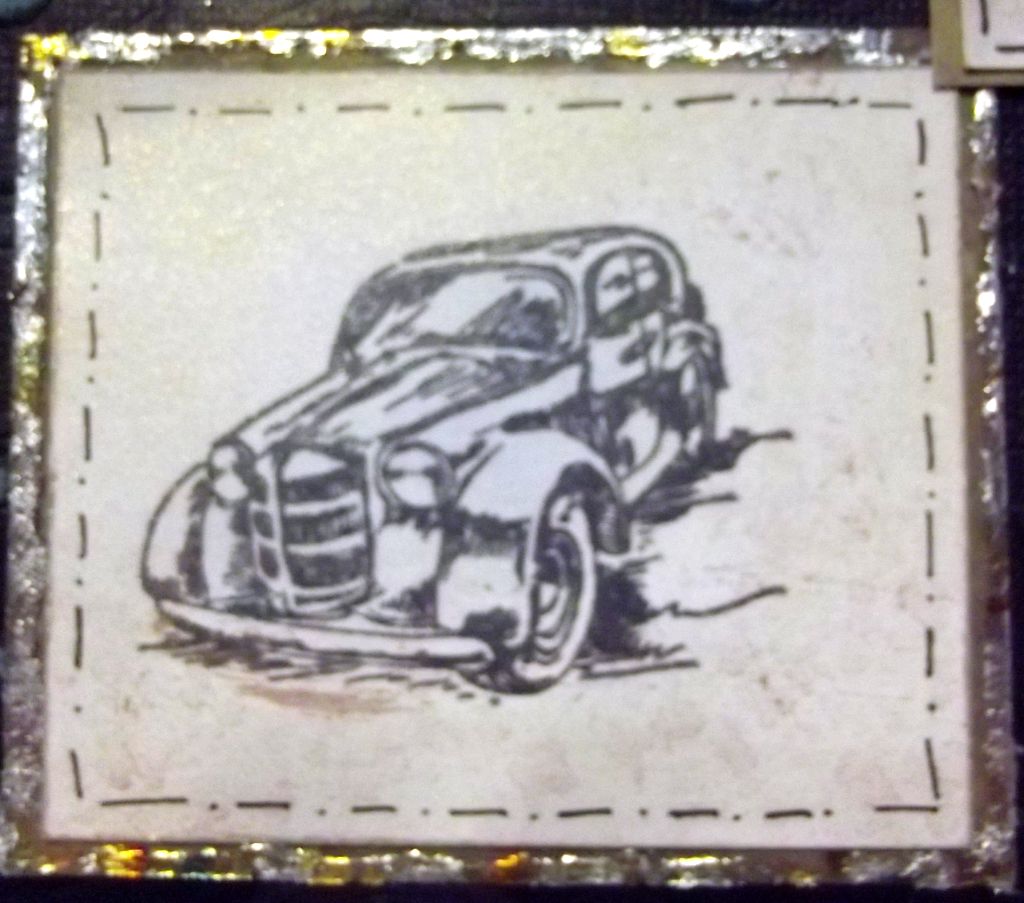
To the stamping – a scrap of white card was used for stamping – I used a lovely vintage car stamp, the put a few sprinkles of mica powder into a spray bottle, added a little water and shook well before spraying the stamped card...then blasted with a heat gun to dry and finally dipped a brush into a grey mica powder and dabbed it over the stamped image, tapping to remove the excess, I then sprayed the cheap hair spray up in the air and let it drop onto the stamped card to seal the mica powder.

I used a scrap of the kraft card – cut it slightly bigger than the stamped card, ran my Cosmic Shimmer PVA around the edges and then dipped into a tub of gilding flakes! Brushed the excess back into the tun and buffed with the sponge.


After using a fine line pen to create a faux stitched border around the stamped image I stuck this to the kraft card then to my card in the bottom left hand corner.

Did much the same but using Happy Birthday and attached to the top right hand corner – I didn't use the gilded flake border on this panel though


The magazine showed a piece of Hessian with the edges frayed – it was positioned just above the stamped car and I really think it will fit in well with my style of card....so if you see it in my room please yell out as I have searched and searched!!!

That's it then... a very quick and easy stamped card featuring gilding flakes, mica powder, masks, core-dinations card and faux stitching!

See you next time....x

Friday 27 April 2012

A shining example!


Apologises to you all for been on so late today!

Lets blame my hubby Pete – he decided we were having a treat today – a yummy Indian take away....believe me if you saw the meal deal you would understand why I'm so late!

Better just add I will be giving my weekly weigh in a miss tomorrow morning I think....

To the card!

I was sent an email with an idea for a card – thanks Jae – so had it in mind that I was going to try that card out myself today!

Things didn't go quite to plan really – I hadn't known we were having a few hours out – but I did enjoy it so no problems! It just meant I had less time to play that first expected!


I folded a sheet of white A4 card to create my A5 card blank...and used a pretty scroll effect rollergraph stamp – if you want to know more check out this website...


That link should take you straight to the rollergraph items

Instead of using an ink pad or versamark ink pad I used FlitterGlu by IndigoBlu. This is a specially formulated adhesive to use with Gilding Flakes...


So following the instructions of using half a teaspoon of glue I then used my phat foam – this is the Cut & Dry foam I use for shading when I use ink pads – so I loaded the phat foam with glue then scraped most of it back off again, rubbed the phat foam all over the rollergraph stamp then positioned the rollergraph at the top of my card about 3cms from the left edge and pulled it down the card.

Next was the fun bit – I rubbed the stamped area with Copper Thunder Gilding Flakes and when I was happy it was all covered I rubbed the excess away with the Scoochy sponge – I was left with a lovely foiled border...


I used the phat foam and FlitterGlu again but this time I used a sentiment stamp by the Glitter Girls – I stamped direct to the card but had too much glue on so it was very messy – rather than waste the card I re-stamped onto a scrap of white card – covered with the same gilding flakes and after rubbing off the excess matted it onto a piece of pretty gold card which I then stuck to the card blank.

After that I used the foam and glue to stamp an lovely Inkylicious butterfly onto a piece of Clearly For Art modelling film – this looks for all the world like thick acetate – but you heat it and mould to how you want it , once it cools it sets – if you make a mistake simply re-heat and start again


So I stamped a butterfly and covered with gilding flakes – after it was rubbed down I cut it out and heated until I could mould the wings a little! Its great stuff and I will have to play again to see just what I can do with this!


So that was my playing for today – yes the card looks messy – it has sections when it wasn't stamped correctly so not enough gilding flakes – and other areas where I had too much glue which has transferred to the card – but I really don't mind as this really was just a sample piece!

Its been such a long time since I have had as much time as I want to actually sit and play with my goodies!

Who knows what I might have to share tomorrow...

x

Thursday 26 April 2012

Just for you...


Can't believe it's Thursday again already!!

Where are the weeks going? Its 2 weeks since I arrived back home from my stay with Jae...before we know it kids will be breaking off for summer holidays then it will be Christmas!!!

So lets get back to today's card....

I have several new cards now but decided to share this one....

I joined a group on facebook called Jammi Pandas – it is run by Fee J who crafters will know of as she has a huge catalogue of crafting cds...

Well I spotted that she hosts a card challenge – she provides a selection of sheets and gives instructions on what can and cant be done.

This time it was 3 different backing papers, an insert and a sheet that had 2 toppers and another paper – the instructions were you can make a card of any size and any style but you cannot use any other printed sheets and you must include a button somewhere on the card

After printing out all the papers I was stuck...although they look great there really wasn't a great deal to be done with them....so I thought!

I cut out the heart and the tag and laid them onto various different styles of card blank and eventually I found what I wanted


The card blank was a Craftwork Cards Elegant Easel


I used the paper from the topper sheet to cover the shape of the easel and a bright horizontal stripped paper to cover the base of the easel which I punched the corners using a Martha Stewart Bubble Bath corner punch – I then punched a couple of deckle edged squares of cerise mirri board, cut them into 2 corner to corner, these were then stuck under the decorative corners and the whole sheet then stuck in place.


I matted both the heart and the tag onto cerise mirri board and cut out leaving a narrow border.


After punching a hole through the tag, I used a pink heart shaped brad and then some cerise pink ribbon with white dots was used. The tag was then stuck to the panel at an angle, 3 shiny cerise card candy were placed across the bottom of the panel and down the left side I added 3 pink buttons to which I had slotted a piece of very narrow white organza ribbon


I used the heart as the easel stopper – so it was raised with large double sided sticky pads and positioned to the easel wasn't top heavy.


I then added pointed clear AB gems to the large holes punched out the corners and a deep pink gem in the centre hole.


3 large heart shaped gems were stuck on the heart itself and I finished by adding glossy accents at various places around the card


Personally I was happy with the finished card...I've sent it off for the competition and I know its not good enough to win but I'm so pleased I took the time to actually take part in it!!!

See you all tomorrow
x

Wednesday 25 April 2012

Better With Hugs


Good evening folks

Well have to say the rain that was forecast was here with a vengeance...but then it stopped as quick as it started and it looked to brighten up even if just for a short time!

Anyway let's forget the weather and talk cards...

I got a mega bundle of kits by Paper Creator – it was an offer through an email – so as it was too good to miss it was bought – even though the preview didnt really give too much away

Once downloaded and unzipped I whooped with joy and rushed off to get the photo paper...

So you can expect to see quite a few of these in the coming weeks – I will spread them out so as not to bore you all!

Today's card I've called Hugs – as that is from part of the printed text on the front of the card.


The kit needs 3 sheets printing, one has the back and front, another has the 2 inserts and then a sheet of decoupage, there is also a sheet of backing paper but personally I decided I could live without that!

Back to the card then....I cut down a pink A5 card to a 6” square and used a pretty corner punch on all 4 corners.

I cut out the base images and positioned the layer with text on the front of my card leaving a border all round – then the other on the back of the card.


After cutting out the inserts I added the printed one – I added my own sentiment before printing – to the right hand side and the plain panel to the left side.
Next it was time to cut up the decoupage – this particular kit had a few tricky bits to cut out but it wasn't really a problem – and once cut out and placed on the card with small sticky pads it was worth taking time over.


Now to the decorations....I used a Sakura quickie glue pen to highlight the pink swirls that were printed across the top left of the front then sprinkled with Debbi Moore Shabby Chic pink glitter....

I used the quickie glue pen on the socks, lace of her trousers and stripes on the parcel then sprinkled with iridescent glamour dust.


Using Cosmic Shimmer PVA I run it randomly across the bottom of the panel were the grass was printed and sprinkled with flower soft which I think looks great!


Finally I used the glossy accents to highlight the hearts, the teddies cheeks and feet and the girls shoes.

A super card for any occasion and any age group!

Hope you enjoyed today's offering!!

Till the next time....

x

Tuesday 24 April 2012

Path To Your Door


Hello

Today I am sharing one of the cards I made a few days ago!

Its another stamped effort – I still don't feel ready to tackle the colouring so I look for alternate ways around things and this card shows what I found this time!!


I used a scallop edged 6x6 card blank and as I had a panel of black – white – black – patterned paper with ribbon panel left over from a previous card I decided to make use of it!

So I added the panel to the top left of my card blank to start with.


I chose a lovely stamp that had text as well as a scene on it – its called Path To Your Door and is made by Designs by Tabbykat – at just £6 for this stamps plus a separate cottage stamps, 2 flowers and 7 different sentiments what a bargain!

So I stamped the full design direct to a piece of smooth white card, trimmed it close to the edge all round then spritzed with a Cosmic Shimmer spray bottle that I put a small amount of a light bronze mica powder then added water – shook really well and sprayed all over. I used my heat gun to dry the card – if it starts to curl just flip the card over and run the heat gun over it until it returns almost back to flat!


Although it looked ok I wasn't totally happy with it – so used a cosmic shimmer brush to take a tiny dab of mica powder – I used a pale pink for the top flower, lilac for the other flower, a green for the shrubbery and a reddy brown colour to dab the cottage....I was amazed at the difference those tiny amounts of colour actually made to that panel!

As some of you will know, mica powder is lovely – but tends to rub away unless it is sealed – to seal you can used a clear ink pad and then colour with the micas the heat to seal – or the quick and easy way – which I used – was to spray the cheapest Hair Spray – I got a 300ml Asda Smart Price Hairspray for just 37p – I placed my stamped panel on my glue tray – sprayed the hairspray in the air and let it land on my panel – hey presto – its sealed!!! And doesn't smell too bad either!


I matted the stamped panel onto a panel of black card then used large sticky pads to attach this to the card – overlapping the panel I first put on my card.

I rummaged through my sentiment stamps and came across one that seemed appropriate – Treasure every moment.... so stamped with black memento and matted onto black card. This was put onto doubled sticky pads and added on an angle to the top right of the card.


I used a couple of plain white paper flowers – coloured them using a black promarker then rubbed all over with my Versamark ink pad and covered with Stamp-n-Stuff Kaleidoscope Transparent embossing powder – heat embossed and added a plain silver flower shaped brad through the centre of the flowers and through the card.

I finished off with a simple insert

I have since making this card shown it to several people and the comments that I've had have all been good – good enough to make me play again!

I do hope you liked the card, and that it may encourage you to have a play with stamps but not worry about colouring your finished design!

See you again tomorrow
x

Monday 23 April 2012

Messing Around....


Hello

Yesterday I had a great day playing and made a few cards – one I shared with you and the other I am saving for now

When I went to the last craft show in Harrogate I saw a demo done using stencils and glitters

I had all intentions of buying the glitters but for whatever reason I didn't get back to the seller and only remembered on the way home!

But I did have a floor plan so thankfully managed to work out who the seller was and was able to then order some of the glitter

The website is http://imaginationcrafts.co.uk/ and the glitter I mentioned is actually called Sparkle Medium – it comes in big 50ml pots for just £6 each...

I did order 3 pots straight after the show then forgot all about them until having a rummage for something – but then had no idea on how to use them....

So I used the contact us form on the website and the owner kindly replied the same day – and then a few days later even emailed to say they had now uploaded a video to you tube!

So I had a look and then had a play!

I used Gold Sparkle on Aqua card, Diamond on Black card and Black Star on lilac card!


WOW...its amazing!!

So far I havent made anything with my samples – but I did go back to the website and order more colours and a couple of their stencils too...

So for my samples I used 3 different coloured card stock and 3 different pots of Sparkle Medium – I used a mask from Creative Expressions – That Special Touch and flowers....

I was chuffed with the results – what do you think??

Will get a card made using these samples as soon as I can!

Thanks for dropping by

x