Saturday 30 July 2011

Latest Bag Charms

With lots of orders for these charms I had to make a start

So last night while sat watching - erm listening - to the television I made a start and once I got going I was well away....

This is a picture of the 5 I have finished so far

The red ones were part done when I first had a try so I just rejigged them and added more charms and think they are ideal now...


The green one was also started so I added lots more beads and charms and still love the colour of this one

The purple and the black & white were brand new creations made with people in mind - and again I am really pleased with the finished charm.


A few people have actually seen them today and commented on just how good they were not too mention excellent value for money

Every bag charm I make will have a breast cancer ribbon charm attached somewhere as that is a charity close to every ones heart I think....

Its down to you now - tell me your thoughts - and be as honest as you wish - I can take constructive criticism and I welcome any ideas/comments/thoughts you may have!!!

Thank you for looking

Can you help please?

Hello

As you know I started to make handbag charms and sure enough, I was hooked!!!

After people saw them on here as well as in their hands I started getting orders for them

All money from the sales will go to charity except the first £1 which will go to replace some of the items used

So to the help - please will you look around and see if you have any beads or charms hanging around - even if its just the odd one or two - or if you spot any while passing second hand shops - would you pick them up and let me know - I will happily buy from you and cover the postage costs

My email address is angmacw@googlemail.com

Thank you in advance

Had to share this

While searching the internet for something and nothing - or maybe that should be something for NOTHING I came across a fab blog

It has recipes to make your mouth water - and all sorts of great patterns

I just love the FREEBIES link - its at the top of the page

There you can get knitting, crochet and sewing patterns for all things funky

Like a slice of chocolate cake, peas in a pod, pizza, a kiwi bird to name a few

Here is the link - do try find a minute or two to browse....

Monday 25 July 2011

The Bakery Shoppe

Welcome to today's card which is called The Bakery Shoppe

It was bought from www.craftuprint.com and it is by one of my favorite talented designers Karen Briggs

The kit number is 205151_68 should you be interested.

So back to the card and how I made it...

The kit was printed onto matt photo papers, there are 5 sheets in all - the shop front which has some of the decoupage, shop back, shop inside which has the remaining decoupage and the 2 pieces for the envelope

Its important to read the instructions and follow them or you will do as I did the first time I made up one of these shop cards because instinct told me how to do it - and in fact I messed up and had to reprint it all!!!! A lesson learnt for me.

I started by cutting out all the pieces and added a piece of acetate to the window, there are 2 shelves which are decoupaged to go on the back inside sheet and then a decoupage panel that has tabs on the bottom which slip and fix into slots on the inner sheet.

Once I had the tabs secured in place I decorated the cakes and buns using glossy accents on the cherries and strawberries, pearlidoodles in pink, blue and lilac on the cupcakes and glamour dust in random places for a bit of shine!!!

Once everything was dry I set to work on making up the card - so taking the shop back I scored on the 3 marked lines as instructed and the same 3 lines on the inner sheet, the shop front only has one score which is where the double sided tape is placed to fix the panel in place.

Laying the inner panel on top of the back panel it all lines up perfectly. at this stage I added a strip of double sided tape under the top edge of the inner panel to keep it in place once I moved the card about.

As in the instructions, the next step is to attach the shop front and shop back lining up the shaped roof, I used double sided tape which I removed the backing and rubbed my glue stick over just in case I didn't get lined up correctly and needed to try again.

Once I was happy they were lined up I smoothed them together making the double sided tape bond.

To the bottom of the card I used DST to attach the inner sheet to the shop back then the DST panel on the shop front was attached to shop inner.

The little boy and his dog were decoupaged and had glossy accents on the pocket of the trousers as well as the dogs eye and nose - this was then attached to the lower left of the card to show them peeping through the window longingly!!!

This is how the card looks from the side - it folds flat for posting and easily pops back into shape when opened up.

You can print your verse direct to the shop back using something like Picasa but I decided I wanted to mat my verse to contrasting card stock so printed onto normal paper, cut it with fancy edged cutter then matted and fixed in place with double sided tape!

The black panel in the photo on the card back is where I have cut it as I had written my message before I took the photograph, and as it was to hand to a friend this week it didn't seem right to share that info with you all!!!

I do hope I didn't over complicate the way I made this card - if you get the chance, please do have a go at this type as they are easy but look great when done!!!

Thank you for looking and see you again soon I hope.....


Sunday 24 July 2011

Hand Bag Charms

I thought I would share with you a few of the hand bag charms I made yesterday

This is a brand new craft to me - I have dabbled with Pandora type bracelets and lamp work bracelets

When at the Summer Crafting event last weekend I bought lots of new and exciting charms, chains, bracelets and some findings (that's the name for head pins, eye pins, broach backs, ear-rings etc) and some basic tools

Added to that lot I went online and bought extras I read about needing to complete the handbag charms

I have a nice collection of hand bags now and would love a charm per bag but some of them cost between £10 & £20 each and really they are not worth that much...

So I thought - I can do that!!!

But can I?

Here are some of my first attempts....what do you think???

The first red attempt - it was a longish charm - the picture shows it closed as it would hang, it has a selection of charms and beads of different shapes and sizes that contrast well together

And then this shows the charm opened up so you can see the details a little clearer....despite it looking chunky it is light enough to not notice its there!!

The next one again shows it closed - I loved making this one as I love working with anything green, I find it so calming....

Then with it opened up....I used a hat charm near the attaching keyring and a pretty sandal charm at the bottom!!!

And lastly the short red one....which was actually trimmed from the top red once I saw just how long I had actually made it - so added other bits and think it worked well - doesn't  it?

I know this one really does look chunky but that was what I was hoping to achieve!!

Personally I love them all - I did do another one which was a shabby chic type one as it was all recycled beads, charms, coins and chains but I forgot to get a piccie!!!

Next time....

Sun Bonnet Sue

I have put this card together as a project for a card class

Its been so long since I last did any Iris Folding - in fact I lost most of my patterns when my PC packed up last year and never gave a thought to tracking them down again until today

So I headed over to www.circleofcrafters.com who offer lots of free to use patterns as well as easy to follow step by step instructions and in many cases there are completed projects which can be a huge help!!

So please meet Sun Bonnet Sue - Angie Style!!!

I traced around the outline, flipped the tracing paper over and retraced the design direct to my card stock - this was an A5 piece of thin off white card stock then cut out the aperture.

Turning the A5 card over I stuck it with low tack tape over the chart so I could follow the number fold lines...

The pattern showed I needed 3 colours so I went for light weight  pearlescent paper in blue, green and purple with a piece of silver holographic card for the eye.

For anyone not familiar with iris folding, its is simply a case of take a 3cm strip of paper, fold with a sharp fold and then lay the fold again the printed line of the chart in number order - so start at 1 and work through to the last number - there is a chart to help with colours IE col 1 - do number 1, 4, 7, 10 etc then col 2 - 2, 5, 8, 11 etc and finally col 3 -  3, 6, 9, 12 and so on....its easy once shown I have to admit

I laid the 1st colour strip across the fold line number 1 and tore it so it overlapped the edges slightly and held in place with a small piece of DST - continued this way until I was only left with the eye - I placed a 3.5 cm square piece of silver holographic card over this and secured firmly.

I removed the low tack tape and turned the card front over to admire my work!!!

The arm is cut in one piece in any colour you chose, so I went along with the blue which was rested between the purple and green so really stood out.

Next I took a sheet of navy blue A4 card and folded to create my A5 card blank, used a Martha Stewart Cherish corner punch on all corners then used a fancy edge blade in the Woodware trimmer to cut the 4 sides on my iris folded card stock.

Thin double sided sticky pads were stuck to the back of my iris folded panel and secured centrally on the navy card blank.

To take the plainness off the white card I used 4 silver peel off corners and then matted a "With Love" sentiment onto a piece of dark red pearl paper and added on an angle to the top left corner.

I chose 2 paper flowers on stems which I folded in half then covered with 6mm white satin ribbon and attached to the card under Sun Bonnet Sue's arm

How pretty is that!!!!


Friday 22 July 2011

Boxed Wedding Card

Today I am showing off a stunning wedding card

The card itself was actually made by my friend KATIE using her Grand Calibur machine with Go Kreate cutting dies
 (Sorry I have mis-informed you, this was done using the GRAND NESTABILITIES- thanks for correcting me Katie)

Katie has these easel cards down to a fine art now - which is just as well as I needed a card and was bogged down with other orders.

So the base card was given to me all put together - that is the white card and pink patterned paper pages including the verse and a stopper, with a pretty pink ribbon down the centre spine

All that was left for me to do now was organise the flowers!

As the wedding is on Pink & White I used flowers in both colours

I just couldn't decide whether I should show the flower stalks or remove them altogether - decisions decisions!!!

From nowhere it came to me to actually bind white satin ribbon around the doubled up stalks which made it resemble a wedding bouquet, and I added another piece of the same ribbon with two tails just hanging.

In my ribbon box I found some pull bow ribbon which luckily was in a pink iridescent shade so I made the loopy bow and attached to the top of the pink ribbon spine and left the 2 tails dangling to the bottom of the card

Soft white tissue paper was rolled at the top and bottom of the box to create a frame for the card - I think it worked well - don't you?

The card has been safely delivered to the bride to be ready for her big day on Friday 22n July

Many many thanks to Katie for saving the day yet again!!!!

Wednesday 20 July 2011

Wedding Cards Galore

Well I was asked to make some wedding cards by family and friends for a young couple who will eventually tie the knot this coming Friday

Talk about last minute orders!!

As I have made the cards I thought I may as well share them with you - so here goes....

The 1st two were kits I bought from www.chameleoncardcraft.co.uk both as downloads and just 99p per kit

This is the EASEL version - you get the easel base card, decoupage sheet with topper, a backing paper to back the easel base and then the envelope....it goes together perfectly, and I decided to add a simple verse under the easel

And then the POP OUT STEPPER version - again the kit is complete with pop out stepper base, a backing paper, decoupage sheet which has the topper on and then 2 pieces for matching envelope. I printed the verse and used the Martha Stewart CHERISH corner punch before attaching the verse to the back of the stepper.

The next is a complete kit, again available to download, this time it came from Susan Murdoch. This is info on the sheet www.geocities.com/the.murdochs@btinternet.com/index however it turns up a blanks so I suggest you contact me for more info!!!

The kit comes with with a choice of 2 different designs - the one I did which was in pink, or one that was in gold and had a slightly different look to it.

The kit has the front topper and a sheet of decoupage, a pop out insert with heart shape aperture and the matching envelope.

I added a wedding day sentiment to the front of the card and used fine chain and a chunky heart charm to create a dangle in the heart insert, a few co ordinating themed peel offs took away the plain looking inside panels.

And I printed a verse which was then trimmed and had the corners punched and was fixed to the back of the card...

The last of the batch is certainly my favorite - its not quite finished but I wanted to share it with you all the same...

This is a kit from my favorite online download store of the moment www.LynzeysPlace.com
and was a steal at just 75p - especially when you get so much in the kit!!!

This is an arched window shaped card with the vicar, the bride and the groom mid ceremony on the front of the gate fold doors - open the doors and there they are again, all beautifully decoupaged, with bells at the point of the arch and hearts decorating the inside of the 2 doors

The kit also has a matching envelope which really does make it all special - and this card unlike the others is about 5x7 so a nice size for giving

I have to glitter the bride and bells and want to add gems to the flowers and head band and to finish this card it will have a verse printed and attached to the back.

If I manage to complete this card and also the other from Lynzeys that I am working on, I will upload them later!!!

If you want to know more about the kits of where they came from either click the links or send me an email
I look forward to hearing from you!!!

Hope you enjoyed my WEDDING CARD feature....


A Card For A Crafter!

I am sure you will want to have a try at making one of these cards once you see just how easy they are to make

In reality this card is a Top Slot design by the talented Sandie Burchall on www.craftsuprint.com  the kit number is 180900_425

I am not a fan of the shelf cards or these top slots as they need you to do back to back panels which never seem to line up true - so when a friend JAE made a card using the main panel as a topper I quickly followed her lead...with great results every time.

To make this card I printed the whole kit and then cut out the sheet that had the rectangle panel at the top and space to add the tags at the bottom.

I cut out the 3 tags and all the decoupage as well as the sentiment panel and the Especially For You sentiment.

I attached the base image to a piece of black paper leaving a narrow border the chose a textured purple light weight card stock and punched one of the short edges using a Martha Stewart Vintage Lace border punch, the main image was then sat on top and I marked where the sheet needed to be cut - approx 1.5cm above the black border.

Once I had cut the purple sheet of card down I punched this to match - or closely match the bottom punched border, then attached the panel with double sided tape.

I used 2 A4 sheets of white card stock, I attached the who panel to one piece of card then scored across the top, folded over and chopped the excess off, I kept about 2cm or 3cms which I punched rather than leaving straight.

The 2nd piece of white card was attached by using DST on the folded section over then chopping the excess card from the bottom.

Now the fun bit - decorating!!!

I used pearls to edge the whole rectangle panel which was attached on foam pads, then added the sentiment panel again on foam pads and finally the sentiment on foam pads too!!!

The 3 tags panel  was attached to the lower section of card using foam pads then I used large pink pearls on the joins and also the corners of the rectangle panel.

I spent a long time completing the card as I believe detail does matter - so I tied the tinest bow from lilac organza ribbon and attached it above the printed paper ribbon, used clear gems to signify the punched holes in the gem packets and the one pack of gems were done by adding around 25 x 1mm pink gemstones and the next gem pack contains almost 50 x 0.5mm dark blue gemstones

The last of the work was to use crackle accents - this is like glossy accents but when its dry it looks cracked - I added this to the craft knife and scissors to give a realistic effect!

I hope you have enjoyed reading how to make this card as much as I enjoyed making and sharing with you

All comments greatly appreciated

Thanks


Tuesday 19 July 2011

Card sizes explained

Having just explain the method for making the Is It A Book card it dawned on me some newer crafters may not fully understand the paper and envelope sizing

So, a standard sheet of paper or card stock is called A4

Half of an A4 sheet is an A5 piece - so when we fold an A4 sheet of card stock we create an A5 card blank

If we cut an A4 sheet into 2 A5 pieces and then each of those in half again we get 4 A6 pieces

So by folding on A5 sheet of card in half we get an A6 card blank

In card making we would rarely go any smaller but if you fold an A6 piece of card stock you create an A7 card - really this is a mini card or gift card - great for parcels or even place settings at the table.

So remember in short

1 x A4 folded makes 1 A5 card blank
1 A5 folded makes 1 A6 card blank
1 A6 folded makes 1 A7 card blank

And from one A4 sheet we will get

1 x A5
2 x A6
4 x A7

And when looking for envelopes for these cards some will be in the above sizes ie A5, A6, A7 whereas sometimes they may be C5 = A5, C6 = A6 and sorry but I'm not sure about the A7 sizes...

If you wanted to make a bigger card you can but A3 card stock, this is equal to 2 x A4 sheets so would make an A4 card blank,
or the following square cards
 10x10
9x9
8x8
7x7
and any irregular shape you might want to use providing you either have an envelope of can make your own!!!

Your A4 sheet of card stock will make square cards too the biggest been 6x6 and you can do the popular 5x7 cards too....

Always use your Eazi Score board to create your card blanks as its marked out to make it easier for you!!!

I do hope this information has helped you understand the sizes and not confused you more!

Is it a Book?

This is a lovely idea for a special keepsake but I cannot take any credit for it as it was something that took my eye in the last issue of Making Cards magazine - August 2011.

In the mag they used Pampered Pets papers and rubber stamps whereas I have used Fizzy Moon papers and self adhesive embellishments

Nor did I have the same punch so again used my own version of it...

To make this card you need white or cream card stock for the outer card, 3 or 4 different coloured card stock for matting and layering, a lacy border punch, backing papers, embellishments, c6 envelopes, corner punch, hole punch and ribbon....

This isn't a quick card, in fact it took me well over an hour maybe even close to 2 hours to complete and that was as I said using self adhesive elements rather than rubber stamps.

To start you need to create 2 pieces of card to measure 13x15cm and have long sides at top and bottom, take one piece and using a lacy punch, punch down the short right hand side edge, then on the left edge measure 1.5cm in and score a line.

Cut a piece of patterned paper and attach this between the scored edge and the punched edge using double sided tape. This is your card FRONT. Put this to one side for now.

Take the other piece of card and cover the front with your choice of backing paper then trim a piece of the main card stock to the width of your page and 2cm deep and punch a border, this is then attached to the top of the back page - keep checking my photos if you get stuck.

Decide which card stock is going to be which layer - this will remain the same sequence throughout the card, cut a square from each colour you want to use reducing by a small amount with each layer - all you need is a narrow border on each layer.

Round ALL corners on the mats then stick to the lower centre of the card using DST - you can add the embellishment to the mats now or wait until your book is complete and do all pages together.

Stick down the flaps of 3 c6 envelopes (these are the size used on an A6 card) with the long sides at left and right cut all 3 envelopes in half making 6 wallets. We only need 5 for the card.

Take TWO of the cut envelopes and score a line down the LEFT side only, 1.5cm in, then on the remaining 3 cut envelopes score the RIGHT side only, again 1.5cm in. All score lines are valley folds.

Next take different backing papers and cover all 5 mini envelopes, front and back - up to the folds only, then cut 5 strips of card stock to measure 2x21cms and punch the long edge on one side only with the lacy punch - fold in half then this strip will attach to the top of the pocket across the front and round the back - use a good double sided tape for this.

You need to then start making the squares to pop into the mini envelopes - to do this you need to cut the main square to 9cms x 9cms then the next 3 or 4 squares slightly smaller - just like we did for the 1st piece on the back page. Remember to make 5 of these the same, round all corners again and then punch a hole in the top centre of each complete page so a ribbon can be added to take the page from the envelope

Once you have done the 5 pages, cut a short length of contrasting ribbon and loop into each page, trimming them all to about the same length. You can now slot one of these into each envelope with the matted section to the front.

Now to the making up - and the trickiest part of this project - place the envelopes scored on the LEFT side against the bottom left of the card and these with the RIGHT side scores to the bottom right of the back card

Cut a 1.6cm x 13cm strip of card, place against RIGHT edge of back card on TOP of the mini envelopes,

 Place the card front (from earlier) on top of the envelopes against the left edge of the card back.

Carefully punch 3 holes down the left edge going through all layers then 3 holes down the strip of card on the right edge again going through all layers

Attach the layers together using ribbon in any way to suit you - I decided to use 2 pieces at each side so did top to centre hole and tied in a knot at the front, then with the other ribbon I did centre to bottom tied in a knot at the front and trimmed all pieces then repeated in the holes at the other side.

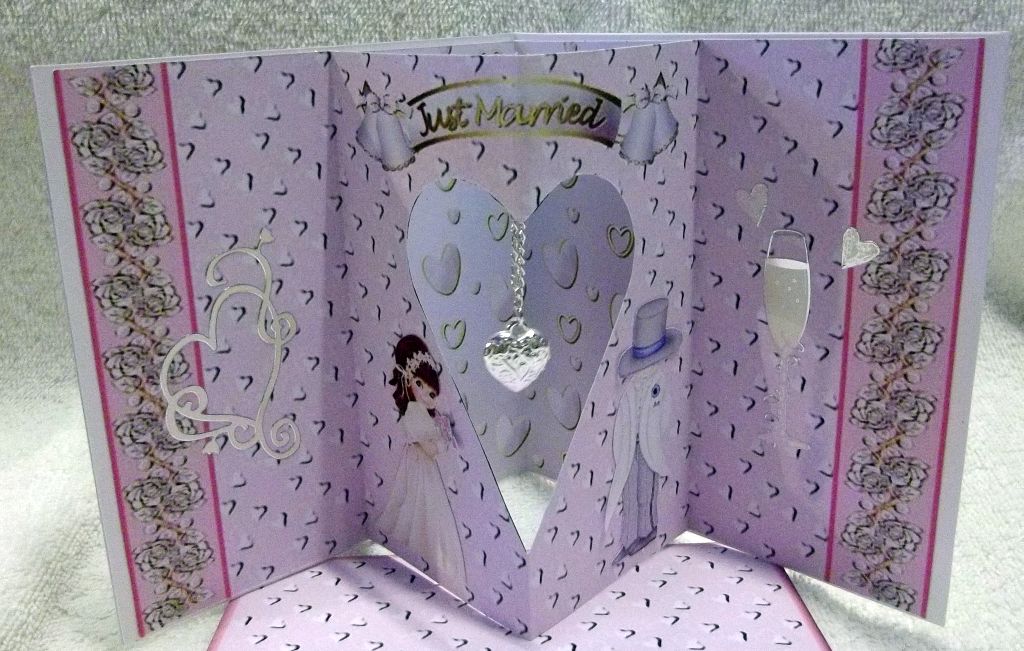
Finally use your chosen embellishments to decorate the fronts of all envelopes as well as front of matted sqaures in the envelopes - you can add sentiments if you chose to make it personal to you....

Decorate the front cover too and maybe add a name of who it will be going to for that extra special touch!!!

As there are 3 envelopes to the right I placed the 3rd onto the back page, then the 2nd left, 2nd right, 1st left and 1st right so it opened alternately....

I hope you enjoyed this project and will maybe decide to have a go yourself - I know I will be making more to suit a variety of occasions - this would be perfect for a wedding or new baby!!

Good luck - and remember if you get stuck, all you have to do is ASK!!!!


Friday 15 July 2011

Friends Are Flowers

I didnt really want to share too many cards from the same cd or designer but as the new Cupcake Crafting cd has so many lovely images, toppers, decoupage sheets and even quick cards I just had to print out and make more

With this card I did something a little different as you can hopefully see from the photograph

I used an A4 sheet of black card stock to make my A5 card blank - and used an A5 piece of pink printed and glittered cardstock

I used the Woodware finger guard trimmer and stamping blade to cut a lovely decorative edge around the backing card and put to one side for now,

Next I cut out the large topper and decoupage - these sheets come with a large and a small set so your printing goes even further,,,,

The decoupage was tricky in places and if you struggle with cutting out then you can round pieces off instead...

As with all my decoupage, as I cut it out I shape it using the foam mat and white shaping tool, and attach each piece as I go using Pinflair glue....

Because I am using a glittered backing sheet there are problems in attaching things to it - one way which always works is to decide where your topper will go then rub away the glitter using a craft knife - just enough so the DST or pad can stick to a flat surface....

I decided to try something a little different - and I think it turned out great - I cut 2 very narrow  strips of acetate - about 1cm x 7cm long - attached one on the back of each of the 2 shaped petals at the top with double sided tape, then put a small piece of DST onto the BACK &  FRONT of the other end of the acetate

Taking the glittered backing I positioned the topper on it then removed the backing from the DST on the BACK of the acetate strip and attached it BEHIND the glitter card

Next I stuck the whole glitter panel onto the card blank to leave an equal border all the way round.....remember to remove the last of the backing so the acetate sticks to the card between the glitter card and card blank.

I chose a sentiment topper which was mounted on thick foam pads and stuck below the hanging topper - as I mentioned above, I scrapped away the glitter where the sticky pads were going to go.

All that was left was the embellishments - that turned out to be 2 huge pink gemstones in the top 2 corners and a selection of different sized gems in a deeper pink decorated the sentiment topper.

Glossy accents were added to the centre of the sunflower and nozzle of the watering can on the hanging topper and the flowers on the sentiment topper....

Thats another pretty card ready to go!!!

If you would like to OWN this card - please leave me a comment and I will add your name to the hat and send to the winner!!!

Smell The Flowers

Before I start my card for today I really must apologise for not being around for a few days - my PC has been proper poorly and although I had access to 2 others I just couldnt get the photos uploaded, cropped and ready - and I had no interest to be honest!!

But thanks to my ever so patient hubby Pete, Im back up and running again so hopefully be back to posting at least a card a day!!!

Todays card is another taken from the new Cupcake Crafting cd GARDEN DELIGHTS.

For this card I used a bought 5x7 scallop edged card

I used double sided tape to secure the base layer which was the broad pink then lilac border to matt silver mirri card, then onto a deeper purple, leaving a narrow border on each layer.

This was then attached to the card blank again with double sided tape.

As I cut out the decoupage pieces I shaped them on the foam mat using the white shaping tool then fixed in place with pinflair silicone

When shaping the last pieces I added more pressure in a circular motion, starting at the outside and spiralling inwards - this makes the piece look like its padded which looks great on the butterfly and the teddys arm.

Once all my decoupage was in place I chose self adhesive pink gemstones in 2 sizes, the larger size was used in the centre of the 4 large flowers and also the 4 corners of the design

The smaller gems were then stuck in each scalop around the card...

Tiny amber gemstones were used inside the flowers on the Birthday Wishes panel - you cant beat a bit of bling!!!

Finally I used white enamel accents on the butterfly wings and whites of teddy's eyes and the black enamel went on teddy's nose!!!

I was really pleased with the finished results of this card, I added a general birthday sentiment and now its ready to use!!

I do hope you have enjoyed this step by step - come back again tomorrow for the next installment!

Oh and all the news of my day out at the Summer Crafting show.....


Tuesday 12 July 2011

Brrr Its Cold Outside

Well it was when this jolly snowman was made!!!

This card was made from a kit and I just had to share it with you as its small but perfect!!!

The kit was bought from http://www.lynzeysplace.com/ and comes complete with the card, decoupage, insert and envelope all for an amazing 75p!!!!

I printed the sheets out then used Crafters Companion Stick and Stay to attach the sheet to a sheet of lilac A4 cardstock, then cut the base card out.

The decoupage was cut out carefully and each layer was shaped and mounted using tiny sticky pads.

There are lots and lots of layers of decoupage but I stopped when I felt it had enough for my taste - in fact you could even get this card and enough decoupage left to make another just supplying your own backing and card blank!!!

I edged the snowman and the christmas trees in the background with a quickie glue pen and sprinkled with glamour dust then coloured the trim on one childs hat, pom pom and snowball on the other child with the quickie glue pen and covered the area with glamour dust.

The snowflake dots on the hats were done with the white enamel accents and the face of the snowman with the black enamel accents.

The envelope was made up by cutting out both pieces and scoring the edges, then I added double sided tape to the edges and once the backing paper was removed I rubbed a pritt stick over the sticky so if I didnt position correctly I could move it and try again!

The insert was trimmed to fit the card and then attached with a small piece of double sided tape at the top and bottom

I must just mention the back of the card is as pretty as the front - see the photo....

And dont forget where this kit and more can be purchased


Hanging The Stockings

Back to Christmas designs in this post I'm afraid...

But I'm sure you will forgive me when you see just how cute this card is....

I have used this sheet many times with almost the same layout just different backing papers and extra decorations and I love it!

The card was made using an A5 card - it was an A4 white which I folded in half, then I covered the bottom half in a dark red patterned paper and the top half in a cream and gold patterned paper.

A length of gold printed merry christmas ribbon was stuck across the seam to hide the join of the 2 papers.

The base layer of the decoupage was stuck to the card not quite centrally using double sided foam tape, then I added the layers of decoupage as I cut them out, shaping first then attaching using small sticky pads.

I have to say the garland is tricky to cut out and it has to be done twice but it looks great and people always make a comment on how it must have taken ages and how it looks WOW!

Although you cannot tell in the photo, I stucky tiny red gems in the garland and stocking borders to act as berries and yellow glitter for the flames on the candles

For the finishing detail I chose a couple of short pieces of star and bead chain which I hung across the top of the card to represent christmas decorations.

I havent added a sentiment but if I do I think it will be placed either along the bottom of the card, across the mantle under the holly garland or between the star and bead chain decoration.

Its from a wonderful site where the very talented designer shares almost all her sheets for free although there is an option to make a donation towards the running of her site should you wish to donate.....

Please check out http://www.3dsheets.tripod.com/index.html and leave Monica a message before leaving....

If you decide to have a go at this card yourself, please share your finished card with me.....I am thinking of adding a Visitors Card Section but would need your support!

Sunday 10 July 2011

Shaped Card

Today I am able to share a card with you....

I stumbled upon a wonderful website that offers beautiful sheets and kits at unbelievably low prices so just had to buy - and didnt know when to stop - but then when a site offers up to 3 sheets in a set for just 50p and 4 or more for just 75p why bother to stop? Crafts You Print and the like charge 80p for JUST ONE SHEET!!!

Check out this site
 but be warned, you will find it difficult to just walk away with out buying - and if you do buy please leave a note for Lyn saying you found her through a link on my blog!!

Back then to todays card - as the title suggests, this is a shaped card and I loved it!!!

I printed the sheet then used Crafters Companion Stick & Stay (RED CAN) to stick the paper to a sheet of cardstock, then cut around the outside of the design

Next I scored down the score line and folded before cutting out the centre white bits, then edged the whole design using a magenta pro marker which matched the inner lines of the card.

The decoupage was tricky to cut in places like inside the cup handles and teapot handle but it was worth taking the time to do

The pieces were then shaped on the foam mat using the shaping tool and then added to the design after using pinflair silicone glue

Once all the layers were added I  used the quickie glue pen to write around the printed Happy Birthday, the flowers and the dots on the teapot edge then sprinkled with glamour dust.

Tiny aqua blue gem stones were stuck to the cake topping using pinflair glue....while a large purple stone was used on the teapot lid.

To finish this lovely card I used a mix of small, medium and large purple self adhesive gemstones in all corners of the card.

As yet there is no insert added mainly due to having to use my old PC which wont take my new printer software - so thats my first job once my PC is up and running again

Dont forget - go and check out this site 

Online Shopping Part 2

Welcome to part 2 of my favorite online shopping places.....
Good news is my PC is on the road to recovery so should be back to sharing cards tonight or tomorrow - yippee!!!

The first site this time is Craft Superstore -
 I would highly recommend signing up for their newsletter as you get a chance to buy some great deals at fab prices
You have to spend £40 to get free next day courier delivery - I like the fact they email to say your parcel will arrive between ** and ** - this is a 1 hour slot, and whenever Ive bought from them my parcel has arrived within the 1st 10 mins of that time slot!!!

On to a favorite for me and probably you too - Joanna Sheen!!
She sells almost everything you could ever need for crafting at great prices, with free WORLDWIDE P&P, minimum spend is £5, and you can pay usuing all cards, cheques or paypal
What you waiting for - go and see what she has in her specials section this month!!!

The last of the online shops for today is Cuddly Buddly which is crammed full of lush rubber stamps and samples to help you create something special
There is no minimum spend but a flat £1 charge for postage
They sell all your crafting needs - the only thing is sometimes items take up to a week to arrive so dont buy if you need something tomorrow!!!

Some time in the future I will be posting my favorite blog sites

Friday 8 July 2011

Online Shopping - PART 1

My PC has died on me taking with it all my new photographs of the cards I have made to share, I know I can take more photos but I am using hubbys notebook and it has no cd drive, no camera software, no resizing/editing programs etc so its not worth the hassle - Im going to be patient and keep everything crossed it wont be long before Pete gets me up and running again

So rather than offer you nothing, I thought I would share my favorite online stores and why they are worth a visit...

To start with the store I use most is Cutting Edge Crafts
they have a minimum £5 spend, its FREE P&P and you can pay with all cards online, or ring and pay, send postal order or cheque, or use PayPal
Everything is sent 1st class recorded
They sell all the top brands and often at discount prices
I would suggest you check this site before buying elsewhere and save the address in your favorites,

The next site is Grafton Crafts
I'm not going to say anymore about this site as it is almost the same as Cutting Edge Crafts - same terms and conditions - again well worth browsing the site and adding to your favorites

Imag-i-nation is a great site for buying your supplies or accessing their wonderful verses for cards....
they are LA PASHE main stockists and you really should check out their £1 section for some amazing bargains - they have a minimum £5 spend with free 2nd class postage or you can upgrade to 1st class for £1.99 - I have always gone with the free 2nd class and most of the time my orders arrive within 3 - 5 days!!!!

Thats it for today as I am struggling to use this notebook on my knee,

Come back soon for the next part....


CRAFT ROOM MAYHEM!!!

I had finished posting for the day - I thought

But when I turned round I was met with what coul dbe described as....

A CRAFTING DISASTER

Just look at the state of this room

Where on earth do I craft - bet you are all saying yep mine is the same

And I bet we all do the same things too - pick up several items and move over a tad - then move them back again when you need to be in that space!!!

I have my crafting rules - so why dont I follow them these days???

I always used to.....

Oh well.....